So What’s the Rotator Cuff Anyway?

What is the Rotator Cuff anyway?

Standing Band External Rotation
standing band Internal rotation
standing band scaption
Standing Pull Aparts

What is the Rotator Cuff anyway?


Drew Faria, PT, DPT


The rotator cuff is a group of muscles that help to stabilize your shoulder. They attach to the top of the arm outside of where your biceps begin. This group of muscles are imperative for shoulder stability, reaching above your head, moving your arm in and out from your body, even getting dressed!
Unfortunately, this group of muscles is often extremely weak and prone to injury in the general population. Acute damage to the rotator cuff – often from a fall onto the shoulder – can cause serious pain, limitations in shoulder movement, and decreased ability to use your shoulder. However, decreased function can occur with poor conditioning of the shoulder over time. By some estimates, up to half of individuals with injury to this area are not even aware of it!
While it may be easy to experience dysfunction of the rotator cuff, it is even easier to get it into shape! By incorporating rotator cuff exercises into your daily routine, you can significantly reduce your risk of injury and improve your long-term shoulder function. In PT, we will often use exercises using rubber-band-like strips of tubing to work the rotator cuff into the motions it is responsible for directing. Here are four exercises you can try out today with one of these bands!


1. Standing external rotation of the shoulder – This will work the external rotators of the rotator cuff. Take a resistance band and anchor it around the inside of a doorknob. Stand to the side of the door, as the picture shows. Keep your elbow at a 90 deg angle and rotate your hand away from your body. Hold each one for 3 seconds, repeat it 20 times. The first few will be easy but try to complete these 20-30 reps and let me know how it feels!

2.  Standing internal rotation of the shoulder – This will work the internal rotators of the shoulder. Internal rotation is essential for reaching behind your back. Anchor the band like the first exercise and turn yourself around to stand alongside the door to the other side. Keep the arm at a 90 deg angle and rotate your hand across your body. Again, hold for 3 seconds and repeat 20 times. If you have pain reaching up your back to grab your belt buckle, you might need some work on this motion!

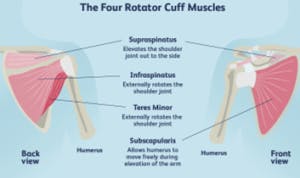
3. Standing scaption – This will target the top of your rotator cuff – a muscle called the supraspinatus – which is probably the most common muscle that gets hurt! This muscle will also get pinched if you tend to hunch forward in a chair at an office desk, for instance. Keep your arms straight and lift them up out to the side with your arms positioned about 30 degrees away from the front. Lift to shoulder height, hold 3 seconds and repeat 30 times. Maintaining its strength is imperative to keeping the rest of the shoulder healthy.

4. Horizontal abduction – This is a 2-for-1 type exercise because you will also engage your rhomboids and trapezius muscles, which are key for upper back posture. If you slow down the movement pattern, you’ll notice that your shoulders need to rotate a bit the farther back you bring them. The farther your hands are from your body – generally – the more you will get the rotator cuff moving! Stand straight and hold the band in both hands directly out in front of you. Pull the band apart so the band comes across the chest. Hold 3 seconds and repeat 20 times.


Questions? Need more guidance on how to deal with that stubborn shoulder? Always follow up with your favorite Physical Therapist!

Make your goals S.M.A.R.T for 2024

Make your 2024 Goals S.M.A.R.T Goals!  Kevin Flaherty, PT 

New Years Day can bring many emotions. We focus on the upcoming year. First, let’s look back at 2023.  I was doing some reading and David Bach, NY Times best selling author asked, “what are you most proud of in 2023?”

I had not thought much about that before but now I believe this is critical for our success in attaining goals.  So first off, what are you the most proud of in 2023?  Go ahead and write that down and then share it with your significant other and family.

I think this is a great way to start off the year!  Starting off on a positive note is a great place to start.

I really don’t like the word Resolution. The Internet’s definition of Resolution is: “a firm decision to do or not to do something.” Resolutions in many ways are things that many of us start, but crash and burn very quickly after starting it.

In PT, many times we are encouraging you to stop something that is not healthy for you, and to start doing more healthy activities. When we set goals, we get your input and we want you to be all in on attaining the goals you want.

When writing your goals for 2023, think about making them S.M.A.R.T goals. Don’t just say, “I’m going to loose weight in 2023!” That is not specific enough and usually will not be enough to get you where you want. Think SMART:

SPECIFIC: Make your goal specific.

MEASURABLE: Make the goal measurable by adding in some tangible numbers.

ATTAINABLE: Start slow and build. Don’t try to sprint through a marathon. Take your time and be reasonable with what you think you can do.

RELEVANT: Is the goal worth working hard for? How can it change your life?

TIME SPECIFIC: set a time frame for the goal to occur within.

So, using our example above, don’t just “I want to loose weight.” but instead, “I am going to loose 20 lbs. by June 1, 2023 so I can feel better in my bathing suit that I will wear to the beach.”

Now, what are the steps you need to take to attain this goal?  How will eating, exercise and habit management help you attain your goal?

What do you need to stop doing?  Can you stop slowly and under control where you reduce something?  Eating less?  Drinking less alcohol? Sit around less?

What can we start doing more of? Trying to walk more? Plan your meals in advance? Eat healthier?  Eat smaller portions?

In any event, start slow, make small changes to your day and plan, plan, plan.  I always tell patients, “somehow, you managed to be consistent with coming to PT 2 x a week for 8 weeks”…..How did you do that?  Why did you do that?  You had to have a plan to get it done.  Let’s help you get a plan to make 2023 your best year ever!

Make your S.M.A.R.T goal just like your PT.

This will be hard.  IT’S NOT EASY!!!!!  But staying consistent with small changes will be a great start and as always, talk with your favorite PT to help you accomplish your goals for the upcoming year!

As always, speak to your favorite physical therapist if you need some help setting up and then attaining the goals you hope to accomplish in 2024.

Kevin Flaherty, PT, COMT

Owner, Physical Therapist, Chief Mojo Officer Flaherty Physical Therapy

What is Dry Needling all about?


Why does Dry Needling work? 

Dry needling is a skilled therapeutic technique performed by physical therapists using monofilaments needles (small & very thin needles) placed in specific anatomical structures including muscles, ligaments, tendons, fascia, peripheral nerves, joint spaces, and scar tissue to treat a variety of neuromusculoskeletal conditions. Dry needling can help reduce your symptoms and allow for improved mobility and function.

So how does dry needling work? By inserting the needles into specific points determined by your therapist, it triggers your body’s own reparative healing response. The needles will increase blood flow to the area, reduce inflammation by bringing in helper cells, and reduce tone to the muscles by breaking the cycle of hyperactive chemical reactions at the neuromuscular junction level. Dry needling can also reduce pain by triggering the release of your body’s own androgenous opioids when inserted through the skin and reduces adhesions in tissue by promoting tissue remodeling.

Therefore, by decreasing muscle tone, deactivating trigger points, and reducing adhesions this will allow for increased range of motion, decrease pain with movement and improved functional mobility so you can return to the things you want to do. Dry needling in conjunction with a prescribed exercise program is an effective therapeutic treatment.

So, ask your favorite therapist if you are a candidate for dry needling!

Kayla Gildea, PT, DPT, Dry Needling certified

Tips and Tricks for Successful Spring Cleaning


Tips and Tricks for Successful Spring Cleaning

The spring and summer seasons are approaching fast, which means many of you are probably starting to think about your annual spring cleaning. Spring cleaning is a tradition that helps us rid the home of winter blues and get ready for the buzzing spring and summer seasons. Do not be intimidated at the thought of your spring cleaning, it does not have to be as difficult as you think!

Tackle your spring-cleaning room by room. This is the most effective way to help plan and ensure a deep clean throughout your home. Creating a cleaning check list for each room can be a helpful way to stay organized and remind you of areas that might need extra attention. Work smarter not harder and skip the areas that have been recently cleaned. This will help you focus on the areas that were largely neglected over the wintertime.

De-cluttering the home is one of the biggest parts of spring cleaning. Here is a 4-step systematic approach to help you successfully organize and de-clutter your space.

Step 1: Identify the problem areas in your home. These are usually the areas in your home with the most clutter including closets, dressers, kitchen and bathroom cabinets, pantries, garages, basements, etc.

Step 2: Think about the “why”. Analyze the reasons for the clutter in your home. Determine whether you will regularly use these items and if not, how often do you plan to take it out of storage for use. This will help you figure out if it is worth keeping.

Step 3: Come up with solutions. Decide how you plan to store or get rid of these items.

Step 4: Implement your solutions. Sort your belongings into 4 categories – trash, give away, store or put away. This method can help you further determine what to keep readily at hand for regular daily use, what needs to go into storage and what you need to get rid of all together. Lastly, move the clutter out as soon as possible! This could include taking a donation box/bag to a charity or having a yard sale.

This should NOT be a one-person job. Get the household involved! Even your children can be great helpers. Assign age-appropriate chores/tasks so that everyone can feel included. Make it fun! Try throwing on some music, have snacks available, and establish a household reward as an incentive to get the work completed.

Incorporate seasonal chores into your spring cleaning. There are specific chores that need to be completed to prepare for the warmer weather approaching. This could include cleaning the grill, cleaning the patio/getting out your patio furniture, and cleaning the windows. Incorporate these tasks into your spring-cleaning regimen and get them out of the way, so that you are prepared to enjoy those warmer weather days. Organize your winter clothing, bedding, décor, and other items as you place them away in storage. You can even implement the 4-step systematic approach to determine what you should keep in storage and what you might want to get rid of. Pull out your spring clothing and décor and give your home a refreshed look!

To minimize extra clutter, keep your cleaning supplies to a minimum. Having large quantities of cleaning products can subsequently create unnecessary clutter. To prevent this from happening you can opt to purchase a good all-purpose cleaner and microfiber clothes, as this will cover the majority of the surfaces in your home. Then you will only need to purchase specialty cleaning products/supplies as needed.

Following these tips and tricks will allow you to establish feasible and sustainable cleaning habits, which can make your next spring cleaning even easier. With busy schedules, it can be hard to commit lots of time to complete this amount of work. For those who may not be able to dedicate an entire day or weekend to this project, that is okay! Chip away at the items on your spring-cleaning to-do list for 15 minutes each day. This can help you get in the habit of regularly tidying your space daily.


What the Heck is a Rotator Cuff?


Understanding the Rotator Cuff
By Rebecca McVay PT, DPT

The Rotator Cuff is the collective name of the four muscles on your shoulder blade that form a tendon that attaches to your upper arm to help to lift and rotate your arm. There is a bursa sac between the rotator cuff and the bone on top of the shoulder known as the Acromion that allows the rotator cuff tendons to glide freely when you move your arm.
When the rotator cuff tendons are injured or damaged, this bursa can also become inflamed and painful. An injury to the Rotator Cuff can occur two ways.
A Traumatic tear can occur when you fall on an outstretched arm or lift something too heavy for your arm.
A Degenerative tear usually occurs with repetitive motions and is usually result of wearing down of the tendon that occurs slowly over time. This can be caused by repetitive overhead sports like baseball, tennis as well as many jobs that require repetitive motions.
Poor posture is a very big contributor to Rotator Cuff injuries. Rotator cuff tears are more common in the dominant arm.

Symptoms of a Rotator Cuff injury include:
• Pain at rest and at night, particularly if lying on the affected shoulder
• Pain when lifting and lowering your arm or with specific movements
• Weakness when lifting or rotating your arm
• Crepitus, or a crackling sensation, when moving your shoulder in certain positions
Physical therapy can help treat many Rotator Cuff injuries. A PT can thoroughly evaluate your shoulder, neck and upper back to help determine a good treatment plan for you and recommend a follow up with your doctor if needed.

4 Common Misconceptions of the Rotator Cuff


1. Rotator Cuff tears are uncommon
There can be some confusion with other shoulder injuries like tendonitis or bursitis, but rotator cuff tears or partial tears are very common, affecting millions of Americans each year. Though a tear can happen to anyone, individuals who are older (40+) or who compete in sports or work jobs that require repetitive shoulder use are more likely to experience a rotator cuff tear.

2. An MRI is needed to diagnose a Rotator Cuff injury
Although a useful diagnostic tool in healthcare, an MRI can be costly and are not always necessary for diagnosis. A thorough physical therapy exam can be used to diagnose a Rotator Cuff injury through functional movement screens that test your shoulder’s strength and range of motion.

3. I need surgery to fix a Rotator Cuff injury
A good physical therapy program is often a great first step to treating your Rotator Cuff injury, to help heal the tissue, restore your range of motion, and regain strength, while providing you with other exercises to help prevent additional future injury. Surgery may be recommended if the rotator cuff is completely torn, or pain persists after 6-8 weeks of physical therapy.

4. Exercise makes Rotator Cuff injuries worse
While some activities that continue to add load or stress on the shoulder can worsen your symptoms, you do not have to take a break from exercise altogether, just need to perform the right ones, and safely. Some exercises help strengthen your shoulder girdle and help relieve rotator cuff pain. Your Flaherty Physical Therapist can prescribe an exercise routine that will be specific to your needs, and help to recover safely while still remaining active.

Remember to always reach out to your favorite Physical Therapist to get some guidance with your shoulder pain!

Enjoying Summer Safely – Katherine Ghyzel, PT, DPT

It’s finally here! After a long, difficult winter we all want and deserve the beautiful weather that comes with a New England Summer. For many of us, with the nice weather comes an increase in the amount of exercise we are performing (outdoor walks, biking, hiking, etc.). We are all ready to get some sun & some more activity, here are some things to remember:

1. Plan ahead – whether it is a walk, hike, run, bike make sure you have a plan on how far to go & have packed accordingly. For example, if you have only been walking household distances, start slowly by just walking down your street or to the mailbox and then slowly increase your distances. That way if you need to take a break, grab some water, or if you are having any pain, a place to rest or take a break is close by.

2. Make sure you stay hydrated! A lot of us do not realize we are not drinking enough water – you should try to drink 3.7 L as a male & 2.7 L as a female per day (according to the Institute of Medicine).

3. Don’t forget the sunscreen – the American Academy of Dermatology recommends that sunscreen is applied every 2 hours when you are outside to all skin surfaces not covered by clothing. They also recommend the SPF be 30 or higher to be effective.

4. Wear appropriate shoes- it is easy to leave the house & go on a walk in your flip flops; but these shoes often do not provide enough support- especially if you are having any low back, hip, or knee/ankle pain. Even though it takes a little longer, your body will thank you for the extra support!

Here are some good exercises that can be performed outside:
1. Walking- there are some great trails around you- some of my favorites are Gates Pond in Hudson, Callahan State Park in Framingham, and Delaney Pond/Watershed in Bolton
2. Biking- don’t forget to wear your helmet and have proper reflective gear especially at night
3. Strength Exercises listed below:
a. Sit to Stands (or squats)
b. Side steps (with or without a band around your knees or ankles)
c. Walking Lunges
d. Single leg stances to work on your balance

All in all, make sure you are getting outside & enjoying the beautiful summer!

Why is your Core so Important? – Elena Jara, PT, MSPT

Why is working your core so important???

Think of your core muscles as the foundation of your body. It is the central link in a chain connecting your upper body and lower body. Whether you are hitting a baseball or vacuuming the rug, the necessary motions originate in your core, or move through it.

No matter where the motion starts, it translates upward and downward to adjoining links of the chain. Therefore, weak, or unstable core muscles can impair how well your arms and leg’s function. And that will affect how powerful your movement patterns are. Properly strengthening our core muscles improves your power. A strong core also enhances balance and stability. Therefore, it can help prevent falls and injuries during your normal day and sports activities. In fact, a strong core underpins almost everything you do. This includes:

1) Everyday tasks- such bending to put your shoes on or picking up a package from the floor or even bathing or dressing- balancing on one leg to slip the leg of your pants on.
2) Physical jobs- a strong core is also very necessary for jobs that include twisting, lifting, pushing, and pulling demanding loads and prolonged standing.
3) Desk jobs- though this can be more sedentary, you still need to utilize your core muscles to practice good posture to avoid stiffness and soreness. However now, there are stand up desks that avoid prolonged sitting, having a strong core also gives you endurance to stand longer.
4) A healthy back – is one that is strong and supported by a solid core. Low back pain affects 80% of people and, maybe prevented by exercises that promote well-balanced, resilient core muscles. When you suffer from back pain, a regimen of core exercises is often indicated to treat it in conjunction with other medications and treatments.
5) Sports and leisure activities – such as golfing, tennis, biking, running, and swimming to just name a few are powered by a strong core and enhance agility, control, and precision.
6) Housework/yardwork- these tasks a require a strong core that stabilizes your body, allowing you to move in any direction, even on uneven surfaces, or standing in one spot without losing your balance. Core exercises lessen your risk of falling.
7) Good posture – weak core muscles contribute to slouching. Good posture trims your shape and projects confidence. More importantly, it lessens wear and tear on the spine and allows you to breathe deeply and more efficiently.

So here are three great core exercises for you to try:

Dead bug

• Begin lying on your back with your legs bent.
• Lift your legs and arms off the ground, keeping your knees bent. Lower one arm to the ground and lower your opposite leg at the same time. Repeat with your opposite arm and leg, then continue this movement. Try this 10 times and increase to 2 sets of 10 if you can.
• Make sure to keep your abdominals stiff as you lower your arm and leg, and do not let your low back arch off the ground.


Plank


• Begin lying on your front, propped up on your elbows.
• Engage your abdominal muscles and lift your hips and legs up into a plank position, keeping your elbows directly under your shoulders. Hold this position. If this is too challenged or causes back discomfort, go onto your knees. Hold 20-30 seconds, 3 times. If you cannot go that long, try 10-15 seconds to start.
• Make sure to keep your back straight and maintain a gentle chin tuck during the exercise.

Bird dog


Begin on all fours, with your arms positioned directly under your shoulders.
• Straighten one arm and your opposite leg at the same time, until they are parallel to the floor. Hold briefly, then return to the starting position.
• Make sure to keep your abdominals tight and hips level during the exercise.
As always, feel free to reach out to your favorite Physical Therapist to get more specifics on the right core program for you!

Avoiding Injuries with Holiday Decorating – Lynne Espino, PT

Avoiding Injury with Holiday Decorating Tasks


It’s hard to believe it’s already that time of year again…time to get the boxes of decorations, lights and wrapping paper out of the attic, garage or basement!  The holiday season comes with many tasks in a short period of time; therefore it is important to learn tips to minimize injury and strain, at what can be a stressful time of year.  Whether you are reaching up to take boxes off shelves or to hang decorations or lights, if it’s done improperly or repetitively it can lead to pain in the shoulders, neck and back.

Before beginning any lifting or repetitive reaching, warm your muscles up, take periodic breaks while working, and stop immediately if you feel discomfort.

Other tips include keeping in mind the importance of lifting boxes and heavy loads correctly, which will help you avoid injury.

Proper lifting techniques include:

-Positioning your body close to the load you are lifting and keep it as close as possible as you lift

-Maintain the natural curve in your lower back

-Tighten your core muscles and tuck your chin towards your chest

-Lift the load carefully and slowly

-Avoid bending and twisting while lifting

If you are reaching a shelf or area above your head, use a ladder with non-slip pads on the bottom to keep it firmly in place.  If needed, bring the ladder up to the level you are reaching to decrease strain on your shoulders and back.  Work with someone else while decorating to make the task more enjoyable and safer.  Lift heavy boxes with a partner to lighten the load and keep your partner close by to hold the ladder safely as needed.  As you lift, use proper technique by using your legs to lift and keeping the natural curves of your back to avoid straining it.  Avoid decorating your roof or tall trees without professional help; most people are not trained or equipped to decorate high places, putting you at risk of falling and causing serious injuries.

Gift wrapping, another holiday task typically includes standing or sitting for long periods of time in an uncomfortable position, which can contribute to back pain.  To avoid this, set up an area in your house as a gift-wrapping station where you can comfortably work.  A tall table or desk works best to stand at, so that you can comfortably reach everything you need.  Wrap for short periods of time each day to break up the task and avoid muscle fatigue and strain until all your wrapping is done.

It is important to note that back, neck or shoulder injuries can occur because of poor posture, repetitive strain/lifting and/or poor working conditions/positions.  Therefore, being conscious of lifting properly and not overstraining can go a long way towards preventing injury.

These tips will help avoid injury and make the holidays more enjoyable!


Back Pack Safety – Chris Awdycki, PT, MSPT

Although this school year will be like one we’ve never known before, there will still be some familiar aspects to going “back to school”. One of these things is that most of our children will be wearing backpacks on a daily or every other day basis. Believe it or not, choosing a good backpack is not as simple as picking a favorite color or a favorite brand. Choosing a poorly fit backpack can cause back pain, postural issues, and/or alignment issues that can then lead to other joints hurting.
Follow these tips when choosing a backpack to provide the most support and comfort:
1. Look for wide and padded shoulder straps
2. The back should be padded as well
3. A backpack with a waist and/or chest strap is a plus as it helps to keep the weight of the bag closer to your child’s body and helps maintain their balance
4. Backpacks with multiple compartments are key to help distribute the weight of the items more evenly

Once you have the right backpack for your child, here are some other tips for using their backpack correctly:
1. Always use both straps when carrying a backpack
2. Make sure the shoulder straps are tightened so the backpack is fitted to your child’s back
3. Fasten chest and waist straps if the backpack has them
4. Pack the heaviest items at the center of the bottom of the backpack
5. Use multiple compartments to help distribute the load
6. Do not overload backpack – multiple sources state that a backpack should not weigh more than 5-10% of a child’s body weight


Walking on the Beach. How to do it and stay safe!

Walking on the Beach! Benefits and Safety tips – Elena Jara, PT, MSPT

For many of us, when we think of the beach, we consider relaxation, looking out into the ocean, feeling the beautiful sand between our toes and sunshine on our faces. If you li

ve near a beach or plan to visit a beach a beach sometime, you would be pleased to learn that going for a walk on the beach also has some surprising benefits.


Let us take a look at 7 benefits that people may not really realize exist they could gain from a walk on the beach.

1 – You burn more calories.

If you are thinking about losing a few pounds or simply trying to maintain a healthy lifestyle and body weight, exercise should be part of the mix. When you exercise, you burn calories. This activity, in combination with a healthy diet, could place you at your optimal body weight and in turn could also provide you with great opportunities for continued health and well-being. By walking on a beach, with its successive curves and uneven surfaces, your body must work harder to move from one spot to another and use more energy. It is also a challenge to your core and lower extremities to ambulate and balance on the un level surfaces.

2 – Opportunities to vary exercise sessions.

Yes, you can burn more energy and calories by going for a walk on the beach. You can also vary the degree or intensity of the walk, thereby varying the amount of effort and energy exerted. Research shows that there is increased energy expenditure when walking on sand and more than that expended when walking on grass. You could take a brisk walk on the beach where your feet hardly have enough time to sink thoroughly into the sand. This could also be relaxing, refreshing and may also provide a massaging effect for your toes and the soles of your feet.  However, you could also move at a much slower pace while walking on the beach and this intensifies your use of energy because your feet has the tendency to sink deeper into the sand beneath it when you walk at a slower pace. If your feet sink deeper, what happens? Yes, you probably guessed it – it will surely take a little more effort to pull your feet back out and continue your walk.

3 – Tone up your muscles!

The benefits keep getting better and better! Toning and firming your muscles sound good- right? Walking on a flat firm surface provides the same force and pressure and as a person walks on such surfaces, there is no or little need for the tendons or muscles in the legs and feet to vary the amount of pressure provided in relation to the surface a person walks on. However, when walking on a beach with sand passing through your toes, your muscles can put in fluctuating resistance to the sand beneath the feet. This is much harder than merely walking on a flat surface where the expected depression caused by the toes is practically non-existent.

4 – Gain with less pain.

There are certain types of exercises that may wreak havoc on the joints and other parts of the body. For instance, using mechanical exercise bikes or jogging on a treadmill extensively could begin to cause joint pain over time. This occurs because of the amount of pressure being exerted on the joints without adequate time for recovery or relief to the over-worked areas.

On the contrary, a walk on the beach presents you with a less tedious exercise option. Yes, you have less likelihood of burning out your muscles or hurting your joints when you choose the less tedious option of a walk on the beach! Also, running on sand may provide low impact. Sand act as a cushion to the feet and absorbs some of the pressure that would have been totally felt by your feet.

5 – Reconnect with the Earth

Walking barefoot on the beach can enable you to feel the texture of the sand beneath your feet and between your toes. It could be an invigorating experience and a stress reliever too. Nature is all around us and sometimes we are too busy to fully appreciate it.

6 – Soak up some sun!

Yes!!!! Being outside presents an access to natural Vitamin D. Vitamin D is needed for moods and good bone structure. It can also provide some anti-cancer properties. Sometimes schedules and lifestyles including work patterns and personal habits may keep people indoors for extended periods of time daily, weekly, monthly, and possibly yearly.  Benefits of absorbing Vitamin D include minimizing the risk of falls especially in the elderly, minimizing the risk of cardiovascular disease, minimizing the risk of bone fracture, regulating blood pressure and decreasing the risk of colorectal cancer.

7 – Simply being outside and enjoying the view!

You feel the sun shining on your face, smell the ocean drift, feel the cool breeze, and feel any existing stress fade away. Time flies by too because of the relaxing nature of the beach and the tranquility created by the environment.


Here are also some important safety tips to think about when walking on the beach


  1. 1. Can you walk barefoot on the beach?

Yes! walking barefoot on the beach can enable you feel the texture of the sand beneath your feet and between your toes. It could be an invigorating experience and a stress reliever too. However, if you have difficulty walking barefoot on level surfaces secondary to a recovering injury, chronic lower extremity issue or back condition and benefit from shoe wear for support, it’s probably best to wear supportive shoes when walking on the beach. This is not to say you cannot try to go barefoot, perhaps go for a shorter period to avoid soreness or pain. When it’s upwards of 100 degrees outside, the squishy sand doesn’t feel so great (and can even cause burns!). Be sure to bring a pair of shoes with you in case the sand gets unbearably hot.

  1. Check the weather. Sometimes summer weather can be unpredictable.  Double check your weather prior to going out to stay safe.
  2. Save your skin! Just one blistering sunburn in childhood or adolescence more than doubles a person’s chance for developing melanoma later in life. Racking up more than five sunburns at any age also doubles the risk for melanomaKeep the red at bay by slathering on a broad-spectrum sunscreen of SPF 30 or higher.
  3. Hydrate and fuel up. Extended exposure to heat and the relaxing effects of waves can easily lead to disorientation and reduced energy. Be sure to bring plenty of water and snacks down to the sand with you and use them if you intend on walking for a prolonged period.